10 Easy & Unique Ways To Decorate MDF Pre-Marked Round Bases

Congratulations! At last, you have embarked on a mission to revamp that corner wall in your living room. And, you have decided that you’ll be putting your creativity to good use by decorating the wall with round wooden decor. So, you buy some MDF pre-marked round bases, and then…
What next? How do you decorate these pre-drawn MDF bases ? This question is worrying you, and you have absolutely no clue. Fear not, for we are here to guide you through 10 easy and unique ideas that will add that "wow" factor to your living space!
1. Colouring and painting
Colouring and painting- This is the basic step for all the MDF pre-marked round bases . This lays the foundation for any other enhancements you plan to make on it. So, how do you go about painting on these bases?
Use paints, such as acrylics or watercolours, to colour in the pre-marked sketches. Choose a colour palette that suits your artistic vision and complements the subject matter of the pre-marked designs. Consider the mood you want to convey and the overall aesthetic you wish to achieve. You can opt for realistic colours, bold and vibrant hues, or even a monochromatic or limited colour scheme for a specific effect.
Imagine how the wooden base would look up there on the wall after completion. You will get a fair idea of the colours you need to incorporate into the design.
Depending on your preference and the level of detail in the designs, you can use various painting techniques such as solid colouring, layering and blending, and dry brushing. Don't be afraid to experiment and add your own artistic flair to the pre-marked designs. Feel free to deviate from the original markings and incorporate your own interpretations, patterns, or embellishments.
Once the paint has dried, consider adding a protective layer to your artwork. Apply a clear varnish or sealant over the painted surface to protect the colours and ensure the longevity of your artwork. This step also adds a subtle sheen and professional finish to the piece.
Now, you can leave the pre-drawn base as it is after colouring or enhance it with embellishments and more. But wait, would you want to try applying some 3D effects to it? Here’s where clay moulding comes into the picture. Interested? Read on.
Pro Tip: Use smaller brushes or fine-tipped markers to add intricate details, highlights, and fine lines to the designs. This step can bring the artwork to life and make the subject matter more defined and visually appealing.
2. 3D effect with clay
If you want to go a step further in enhancing DIY base items , try to add a 3D effect to them. How? Simple. Sticking clay onto the pre-marked MDF bases is a fantastic way to add a three-dimensional effect and texture to the artwork. So, shall we proceed? Before applying the clay, make sure the pre-marked MDF base is clean and free from any dust or debris. Break off a piece of clay and knead it in your hands to soften it. Source the clay from any popular online art & craft store . Start by adding small amounts of clay to the areas you want to give a three-dimensional effect. Use your fingers or sculpting tools to shape and mould the clay to match the contours and details of the pre-marked design. Gradually build up the clay to create the desired level of depth and texture.
To make it better and ensure seamless integration between the clay and the pre-marked design, carefully blend and smooth the edges where they meet. You can use your fingers, a sculpting tool, or a soft brush dipped in water to blend the clay and create a smooth transition. Take your time to refine the shape and texture until you're satisfied with the result.
After the clay has hardened, you can further enhance the artwork by painting or embellishing it. Apply acrylic paints, texture mediums, or other decorative elements to bring out the details and add visual interest to the clay elements.
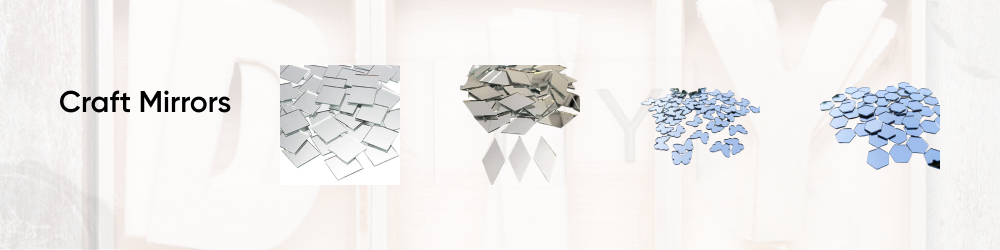
3. Decoration with mirrors
Now that we have completed painting the MDF pre-marked round bases or applying the 3D effect with clay, let’s start enhancing their looks a bit further. Mirrors infuse your artwork with elegance, captivating reflections, and heightened visual appeal.
Choose mirrors that fit the size and shape of the marked areas on the MDF base. You can opt for small individual mirrors with different shapes, such as oval, round, square, and rectangle. Consider the overall composition and placement of the mirrors to ensure they complement the coloured design and create a harmonious visual effect.
Plan the placement of the mirrors on the coloured design. Consider the lines, shapes, and elements of the design and how the mirrors will interact with them. Experiment with different arrangements and orientations to find the most visually appealing configuration.
Apply the adhesive to the back of each mirror. Use a small amount and spread it evenly to ensure secure adhesion. Carefully place each mirror onto the corresponding marked area of the MDF base. Press down gently to ensure the mirrors adhere firmly.
By incorporating mirrors into the pre-marked MDF round base after colouring, you can create a stunning interplay between reflection and colour, adding depth and dimension to your artwork.
4. Embellishments
Similar to the mirror, enhance the pre-drawn bases by adding embellishments and decorative elements. Instead of just painting, these decorative elements add texture, heighten visual interest, and add a touch of creativity to your artwork.
How do you go about deciding the type and style of embellishments you want to add to these DIY base items ? Consider the theme, subject matter, and style of the pre-marked designs when choosing embellishments. There are numerous options to explore, including beads, sequins, rhinestones, buttons, charms, fabric flowers, feathers, and more. We recommend sourcing these from a reliable online store that sells the best craft supplies in India . Select embellishments that complement the overall aesthetic and enhance the subject matter of the artwork.
An important point to consider is planning out their placement before attaching the embellishments to the MDF base. Consider the composition and balance of the design, as well as any specific areas you want to highlight or accentuate.
Apply a small amount of adhesive to the back of each embellishment. Be mindful not to use excessive adhesive to avoid any overflow or messiness. If you're working with delicate or small embellishments, you can use a toothpick or a fine-tipped applicator to apply the adhesive precisely. Gently press down on each embellishment to ensure it adheres firmly to the surface. If needed, hold it in place for a few moments to allow the adhesive to set.
Experiment with layering embellishments to create depth and dimension in your artwork. Combine different sizes, shapes, and textures to add visual interest.
Another recommendation we would like to offer is to try the various arts and crafts of India. This will make your artwork unique and stand out from the similar ones you see on every other wall. For instance, try the traditional Tanjore painting style for decoration. Decorate the pre-marked painted base with gold foil using the gliding technique. Enhance the look with semi-precious stones and 3D embossing. Complete the look with a teak wood frame.
Pro Tip: You can use adhesive foam dots or strips to elevate certain embellishments and create a layered effect.
5. Metallic glitter & accents
If you want to give a modern effect to the pre-drawn base, try adding metallic glitter to it. By doing so, you somewhat deviate from the traditional style and add a bit of sophistication to it. Our advice is, if it gels well with your home decor, go for it. The metallic elements add shimmer, depth, and a touch of opulence to the artwork, elevating its overall visual impact.
Decorating MDF pre-marked round bases with metallic glitter and embellishments can add a glamorous and eye-catching touch to your artwork. Select a metallic glitter colour that complements the pre-marked design or desired aesthetic.
Apply a thin layer of craft glue or adhesive to the marked areas where you want to add the glitter. Sprinkle the metallic glitter over the adhesive, ensuring even coverage, and gently press it down to stick properly. Allow the glitter to dry and set completely. Shake off any excess glitter.
Other than glitter, you can incorporate other accents like metallic paints, metallic markers, or metallic foiling to further enhance the design or highlight specific elements or outlines of the pre-marked design. This can provide a striking contrast and give your MDF base a unique and luxurious look.
6. Mandala art
If the pre-drawn bases have a symmetrical sketch, you can opt for Mandala art to transform them into captivating and visually stunning pieces. You can also DIY base products that are blank and then sketch Mandala patterns on them. Start incorporating various geometric shapes, such as triangles, squares, and circles, within the framework. Create symmetrical designs, repeating elements on different sections of the Mandala to maintain balance and harmony.
Decide on a colour scheme that complements the pre-marked design and evokes the desired aesthetic. Traditional Mandala colours include vibrant hues like blues, yellows, reds, and greens. Use acrylic paints, markers, or coloured pencils to fill in the patterns and details, working from the center outward.
To add depth and dimension to your Mandala art, experiment with shading and blending techniques. Use lighter and darker shades of the chosen colours to create highlights and shadows, enhancing the three-dimensional effect of the design. Blending colours can be achieved by layering and softly blending the pigments together.
Consider adding metallic accents or glitter to specific elements to create a dazzling effect.
To protect your Mandala art and ensure its longevity, apply a clear sealant or varnish over the painted design. This will help preserve the colours and protect the artwork from scratches or fading.
Decorating pre-marked bases with Mandala art allows you to infuse your personal style and creativity into the design. The intricate patterns and vibrant colours of Mandala art will enhance the pre-marked designs, resulting in unique and visually striking artwork that is sure to captivate guests at your home.
Pro Tip: Consider adding metallic accents or glitter to specific elements on the base to create a dazzling effect.
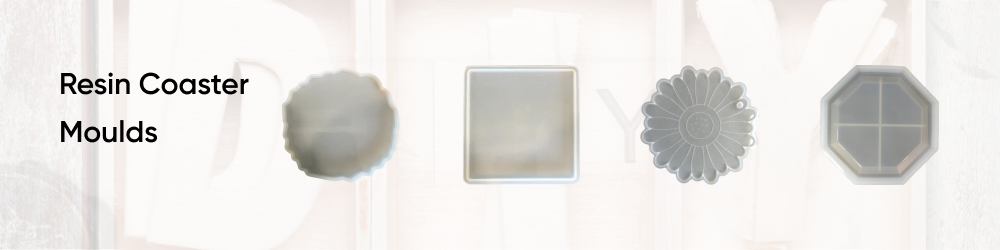
7. Resin art
Another modern creative artwork that can bring a glossy and vibrant effect to DIY MDF bases is resin art. Remember to buy resin art moulds online that suit your home decor. Choose a high-quality, clear-casting resin specifically designed for art projects. Read and follow the manufacturer's instructions carefully for mixing ratios and curing times. Measure the resin and hardener according to the instructions, then mix them thoroughly in a clean container. Stir slowly to minimize the formation of bubbles. Consider adding resin pigments or liquid dyes to achieve the desired colours.
Pour a small amount of the mixed resin onto the DIY base product. Gradually pour additional resin, allowing it to spread and cover the entire surface. Use a spatula or a spreader tool to help distribute the resin evenly.
You can manipulate the resin using various techniques to create interesting effects. For example, you can use a toothpick or a skewer to swirl the colours together, creating marbled patterns.
Once the resin has fully cured, inspect the artwork for any imperfections or uneven surfaces. If needed, you can sand the resin lightly using fine-grit sandpaper to achieve a smooth finish.
Buy resin art moulds online to incorporate unique designs and patterns. The translucent nature of resin adds depth and dimension to the artwork, bringing the DIY base product design to life with a stunning glossy finish.
Pro Tip: You can also add additional elements such as glitter, dried flowers, or small embellishments to the resin before it fully cures.
8. Mosaic tiles
Another unique way to decorate the wall is through mosaic tile artwork on MDF base products. This technique adds texture, colour, and a three-dimensional aspect to your wall.
We recommend you buy pre-marked bases online that do not have intricate patterns. Simple and straightforward designs are best for mosaic tile artwork. You can also buy DIY bases that are blank, as these allow you to sketch the pattern of your choice on them.
Your next task is to select mosaic tiles. They come in various colours, sizes, and materials, such as glass, ceramic, or stone. Consider the overall design and colour scheme you want to achieve.
Take time to plan the placement of mosaic tiles on the pre-marked design. Consider the shape, contours, and details of the design, and envision how the mosaic tiles can complement or enhance your wall. You can sketch a rough outline on the base to guide you during tile placement.
Apply a suitable tile adhesive or mosaic adhesive to the marked areas in small sections. Start placing the mosaic tiles onto the adhesive, following your planned design. Press each tile firmly into the adhesive, ensuring they are level and aligned with neighboring tiles. Leave a small gap (about 1/8 inch) between the tiles for grouting later. If needed, use tile nippers or a tile cutter to shape the mosaic tiles to fit specific areas or intricate details of the pre-marked design.
After the adhesive has dried, apply the grout to the mosaic tile surface, pressing it into the gaps between the tiles using a grout float or a small spatula. Remove any excess grout from the tile surface using a damp sponge or cloth. Once the grout has cured, use a grout sealer to protect the grout lines and enhance the overall appearance of the mosaic tile decoration.
Mosaic tile decoration allows you to add texture, colour, and depth to the DIY bases, transforming them into intricate and visually appealing artworks. Experiment with different mosaic tile arrangements, colour combinations, and tile sizes to create a unique and personalised design that enhances the wall decor.
9. Decoupage
Decoupage is a popular technique that involves decorating surfaces by applying and sealing cut-out paper or fabric designs. It can be a wonderful way to enhance the pre-drawn MDF bases with beautiful patterns and imagery.
You can opt to go for a fusion of coluring and decoupage for your pre-marked MDF round bases. Apply decoupage only to the larger surface areas of the pattern. Choose the paper or fabric designs you want to use for the decoupage. This can include patterned paper, tissue paper, napkins, or fabric with appealing motifs or designs. Consider the colour scheme and overall aesthetic you want to achieve.
Cut out the desired designs from your chosen materials. You can use scissors or craft punches to achieve precise shapes. Arrange and experiment with the placement of the cut-outs on the pre-marked MDF base, ensuring they fit within the marked areas.
Using a soft brush or sponge brush, apply a thin, even layer of decoupage medium onto the marked area of the MDF base. Place the cut-out design on top of the wet decoupage medium, gently smoothing it down to remove any air bubbles or wrinkles. Apply additional decoupage medium over the design to seal it in place.
Continue cutting out and applying the desired designs, overlapping them if desired. Allow each layer to dry before adding the next one. Build up the design gradually, ensuring a smooth and cohesive look.
Once all the designs are in place and the decoupage medium has dried completely, apply a final layer of decoupage medium over the entire surface of the pre-marked MDF base. This seals and protects the design, giving it a durable and glossy finish.
Decoupaging pre-marked MDF bases allows you to incorporate beautiful patterns and designs into the existing markings, giving them a personalised and artistic touch.
Pro Tip: You can further enhance the decoupaged surface by adding additional embellishments or decorative elements. This can include using metallic paints, glitters, or rhinestones to highlight certain areas or add extra texture.
10. Lippan art
Lippan art, also known as Mud and Mirror Work, is a traditional Indian art form that involves creating intricate designs on surfaces using a mixture of clay and mirrors. It can be a fascinating technique to enhance pre-marked MDF bases with a unique blend of texture and reflection. Typically, we are merging three techniques here - colouring, clay art, and mirror decoration.
The first step is to paint the MDF base with the desired colour. This technique works well on a plain wooden base rather than a pre-marked one.
Lippan art typically uses a clay mixture as the base. Mix clay powder (such as terracotta or white clay) with water to create a smooth and pliable consistency. Knead the clay thoroughly until it is free from lumps.
Take small portions of the clay mixture and roll them into thin, long cylinders with your palm. Apply glue to the marked areas of the MDF base, place the clay strips, and press them gently. Smooth out the clay using your fingers or a clay modeling tool to create an even surface.
Lippan art is characterized by the inclusion of small mirror pieces. Take small circular or square mirrors and press them into the clay surface, arranging them in desired patterns or designs. The mirrors can be placed closely together or with a small gap in between, depending on the desired aesthetic.
Use various tools, such as toothpicks, combs, or clay sculpting tools, to create textures and patterns in the clay. You can make intricate lines, swirls, or other decorative elements to enhance the overall design. Be creative and experiment with different techniques to achieve the desired effect.
Once the clay has dried, you can enhance the design further by adding paint. Use acrylic paints in the desired colours to highlight the textures, patterns, and background of the Lippan art. Consider using metallic paints to add a touch of shimmer and elegance.
Lippan art on DIY MDF bases offers a unique blend of texture, reflection, and cultural heritage. The combination of clay and mirror elements creates a visually captivating artwork that adds depth and character to your wall. And if you want something unique, try it!
Wrapping Up
These are 10 easy & unique ways to decorate MDF pre-marked round bases. These techniques can also be used on plain bases. You can source all these at Hobby India, the best online art & craft store in India. This shop has an extensive range of DIY products to unleash your inner creativity and bring it to the fore. For instance, you can buy MDF fridge magnet bases , DIY canvases, embellishments, craft materials, and much more. It is a reliable store to source the best craft supplies in India at affordable rates that you may not find even in your local art store.
So, what are you waiting for? Buy pre-marked bases online at Hobby India and let your corner wall, now, be the center of attention!
